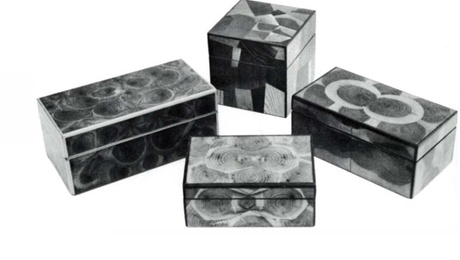
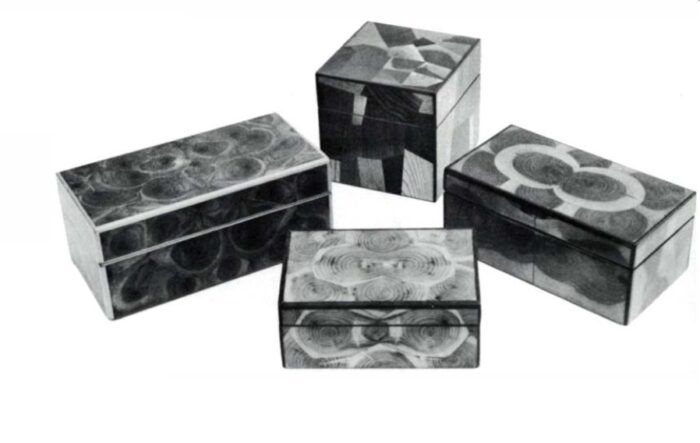
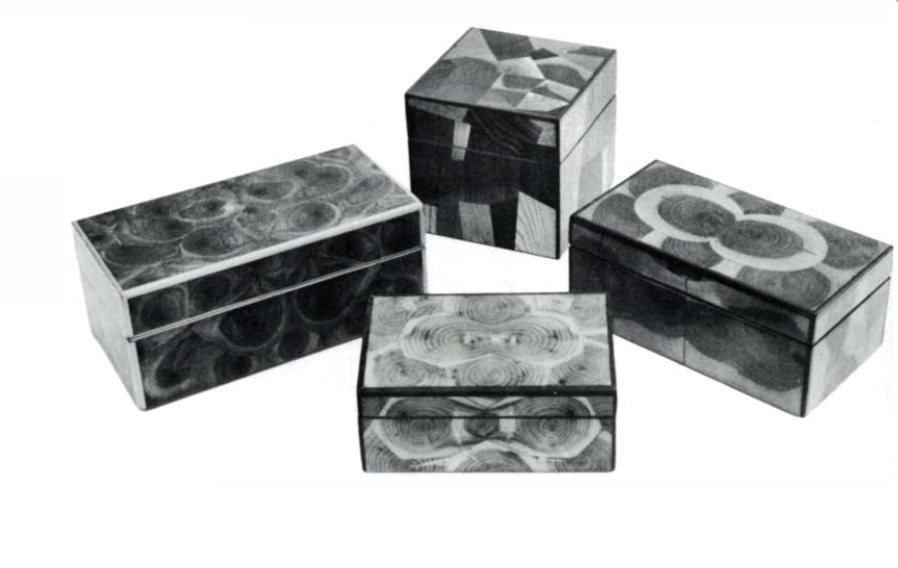
When a department from a tree is lower transversely into skinny slices after which applied to the floor of a field or piece of furniture, the grain and form of the slices resemble oyster shell. Therefore the title of this conventional ornament method: oyster-shell veneering. Ernest Joyce, in his tremendous ebook, The Encyclopedia of Furnishings Making, mentions the strategy, and that, together with the image of a fantastically veneered cigarette field, led me to attempt my luck oyster-shelling a small plywood field. An unproductive plum tree supplied wooden with shut grain, deep reddish heartwood, and creamy sapwood—most tasty for the aim. A locust department, ochre within the middle, helped me uncover extra tips of the commerce.
Reducing spherical sections on the bandsaw is less complicated and safer in case you put a clamp on the department or trunk to stop rolling. You’ll be able to lower smaller branches on the desk noticed or radial arm noticed. Reducing diagonally slightly than straight throughout yields oval shapes, which look extra like an oyster shell. Additionally, angling the lower varies the grain sample although it additionally creates an issue in grain path, which have to be taken under consideration within the remaining scraping of the floor. I lower my slices freehand about 1/8 in. thick and stack them with slim spacers between. Joyce suggests weighting down the stack, and that works pretty properly till you by chance knock one over. Binding the stack with strips of internal tube retains the slices flat and permits simply transferring the stacks from one place to a different.
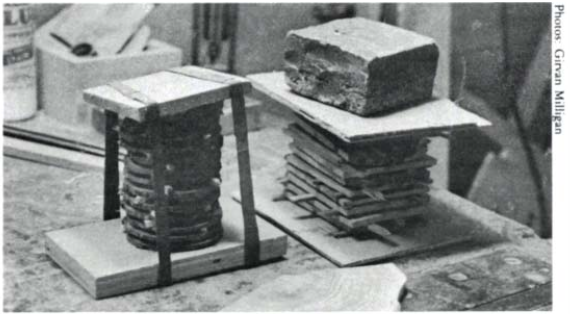
Being skinny, the slices dry rapidly. I experimented with burying the slices in dry sand, placing a number of thicknesses of newspaper between them within the stacks, and clamping them with cauls and no spacers or paper. The sand was the least efficient as a result of it supplied no strain and allowed the items to cup and test badly. Quick lengths of department, nevertheless, may be buried in sand with higher outcomes. Coating the ends of the branches with glue additionally helps to cut back checking. I put one of many stacks on prime of the oil burner to hasten the drying time—a lesson in persistence. The stickered stacks that dried extra slowly in my cool store produced extra check-free slices, although even those that did test with the opposite strategies gave a lot usable materials.
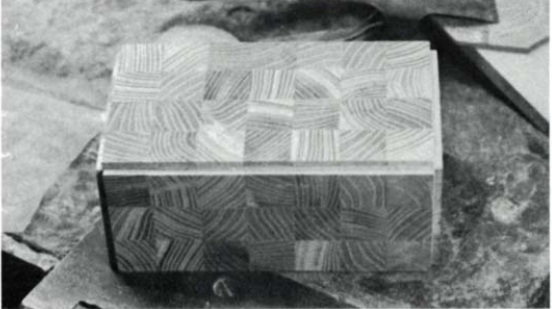
When the oysters are dry you possibly can lower them into squares, rectangles, polygons, or match one to a different within the extra pure curves of the spherical sections. In any case, the joints needs to be hairline. Clearly, straight edges are simpler to suit and preserve sq.; I exploit a taking pictures board and a block airplane. Examine the match of the joint by holding the items as much as a brilliant gentle. Excessive spots may be lower down and checked once more. In working with curved joints you possibly can typically chase excessive spots from one finish of the curve to the opposite since eradicating wooden from one spot adjustments the connection of different segments of the curve. Regardless of the form of the items, have in mind the dimensions and form of the floor to be lined so the completed product can have a balanced sample. You’ll be able to bookmatch adjoining slices from the department to start out a sample within the center and steadiness it with different matching items towards the sides.
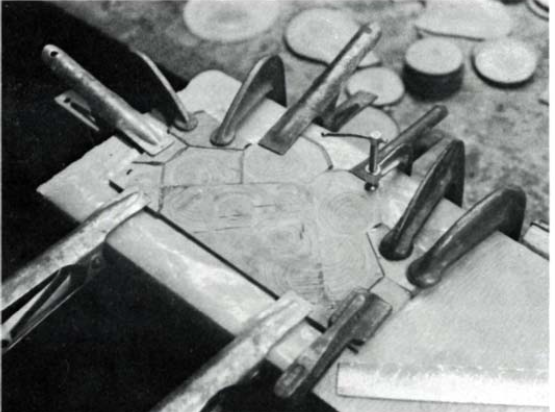
Whenever you’ve achieved a passable match, glue the items collectively one, or maybe two, at a time. If the items are sq. you possibly can glue an entire row without delay. One might lay out an entire panel in jigsaw-puzzle trend and glue it unexpectedly, however in all probability the joints will probably be tighter and meeting much less nerve wracking doing it extra steadily. Trials with adhesives together with white glue, Weldwood, yellow glue, and epoxy got here out in favor of five-minute epoxy. You’ll be able to combine it in quantities sufficiently small for every joint and its energy and pace of setting allow the work to maneuver alongside rapidly. A board lined with a bit of polyethylene and held within the vise is an effective meeting floor. Polyethylene releases any glue and obviates the need of scraping off paper. Small clamps maintain the items in place whereas the glue units and thus stop warping. Clamp down all the sides and never simply the joint: The oysters have a tendency to twist if not held flat. Whenever you’ve assembled an space massive sufficient to cowl the floor to be veneered, trim the meeting a bit oversize and clamp or weight it between cauls till you apply it to the floor. Stage any excessive spots.
Now assemble a field to obtain the assembled oyster-shell veneers. Plywood presents a extra steady base than stable wooden, multi ply birch being the simplest to work. A field of three/8-in. ply, with the panels including one other 3/32 in. or rather less, doesn’t look clumsy and has ample space for fastening hinges. My joinery is easy. I rabbet the back and front of the field and dado the perimeters, all of which I glue and nail collectively. The highest and backside I butt-join, glue, and nail. As a result of the veneer will cowl all the outdoors, the joinery is hid; any sturdy, easy joint will do. The field has no opening but; slicing off the highest is a later step.
Earlier than gluing, coat the again of the panels with a skinny layer of glue and let it dry to extend the energy of the end-grain glue bond. Trim every panel flush with the sides of the field. When all of the panels are glued and clamped in place and the glue has set, scrape the floor degree, taking care to scrape towards the middle to keep away from chipping the sides. When two obliquely lower items have been bookmatched, you possibly can greatest deal with the abrupt change of grain at midpanel by scraping throughout each. A heavy power-hacksaw blade with the enamel floor off and all edges floor sq. makes a wonderful scraper. It’s 12 in. lengthy, versatile, and made from superior metal. Sq. grinding on a tremendous wheel provides an edge that holds, and its size offers the equal of half-a-dozen abnormal scrapers. When the part getting used turns into uninteresting, it’s only a matter of transferring down the blade just a few inches to have a brand-new edge. And there are 4 edges. The sting that had the enamel stays a bit wavy after they’ve been floor off, and this edge provides a rougher however quicker lower. An outdated Victrola spring has additionally given me yards of fantastic scrapers. A belt sander with an 80-grit belt will lower down the surplus rapidly, however take care to keep away from burning the wooden. In a single trial with yellow glue, the warmth of the sander softened the glue. Extreme warmth also can trigger checking and warping.
Whenever you’ve accomplished scraping, lower a rabbet throughout the highest and on all 4 corners to accommodate a strip of edging the thickness of the panel. Lower the edging oversize, and scrape it down degree with the floor. A contrasting coloration, both lighter or darker than the bottom coloration, seems enticing. Slim strips of internal tube wrapped concerning the field make passable clamps for gluing the edging in place.
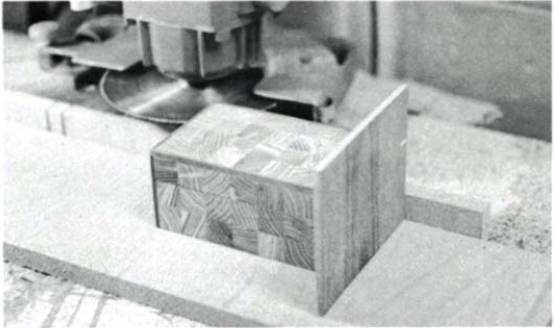
Now the entire field may be sanded to virtually its completed state. There’s extra dealing with concerned earlier than completion, which can properly end in scratches, so it’s best to depart the ultimate sanding until final. Lower the field open on the radial arm noticed in its horizontal place, utilizing a fine-tooth blade, or on the desk noticed. Take care to again up the corners with a bit of scrap to cut back the prospect of splintering the edging.
For those who’ve used plywood for the field, line the field with both veneer or Formica. White matte Formica provides a pleasant gentle inside and might simply be stored clear. Veneer the uncovered edges of the plywood together with the underside of the field. I often set 4 plugs made with a plug cutter into the underside for brief toes, which preserve the underside from turning into scratched.
End the sanding in good gentle, checking for the scratches you don’t consider are there. They in all probability are. The ultimate end is to a big extent a matter of choice, but it surely’s essential that the floor be completely sealed. Polyurethane is sturdy and with plenty of coats and cautious rubbing provides a lovely outcome. Watco oil provides a pleasant end, too, and permits for touching up mars extra readily than polyurethane. Watco just isn’t moisture proof, nevertheless, and in a single field completed with it there appears to be extra growth and contraction of the person items.
Be ready for wooden motion. Cross-sectional items are extremely delicate to adjustments in moisture. Preserve your completed containers away from direct daylight and radiators. To maintain peeling and cracking to a minimal, lower the sections as skinny as potential, dimension them earlier than making use of, and use a moisture-proof end. Even so, you will have to just accept small cracks and gluelines that fluctuate in dimension as a part of the design.
A variation that’s not really oyster work (for the reason that wooden doesn’t comprise the guts) may be made out of all these small scraps you might have hesitated to throw away. Many woods have lovely and fascinating finish grain, and cautious matching and mixing can lead to a good-looking piece of labor.
Join eletters right now and get the most recent methods and how-to from High-quality Woodworking, plus particular presents.