From Positive Woodworking #104:
What number of occasions have you ever been watching a home-improvement present or woodworking video and seen these phrases seem throughout the underside of the tv display? Properly, I wish to know: what blade guard? In nearly all of the instances I’ve seen, a inventory desk noticed guard wouldn’t have labored within the purposes proven.
What’s a woodworker to do? Should we frequently expose ourselves to unreasonable dangers after we carry out operations that require elimination of the desk saws commonplace blade guard—jobs like sawing tenons, chopping field joints and cove chopping? I suppose we are able to hope our luck holds out, or we are able to await some sort of sensational all-purpose noticed guard to hit the market. However I advocate one other different: to design safer desk noticed jigs and setups by including guards and security units that stop unintended contact with the noticed blade. I feel any woodworker brilliant sufficient to design revolutionary jigs for sophisticated woodworking duties might make those self same jigs rather a lot safer with out investing an excessive amount of additional time or materials. In spite of everything, how a lot is a finger price?
On this article, I’ll present you a few of my options for making frequent desk noticed jigs and setups a lot safer. One factor I purpose for in modifying my jigs is to cut back the diploma to which security depends on judgment. It’s a on condition that, as you’re employed, particularly at repetitive duties, there can be occasions when your consideration flags or is diverted. A protected jig protects you throughout these lapses. The easiest security characteristic is one which eliminates the potential of contacting the blade with Rear guard motion—The straightforward outrigger behind the box-joint jig enables you to full the lower with out exposing the blade. something however the inventory. I attempt to get as shut as doable to this supreme in all my jigs.
In lots of instances, I’ve retrofitted current jigs with guards to indicate that you just don’t should construct all new units so as to add security to your woodworking. As a result of jigs are, by definition, custom-made, the protection measures you are taking may even should be individualized. So I haven’t tried to cowl all of the bases right here, solely to share a number of particular options and underscore the final concept that security and guarding options should be constructed into each jig you make.
Clear guards for sliding jigs
Carriages that slide within the tablesaw’s miter slots nearly all the time require that the inventory guard be eliminated. Whether or not you wish to use a sliding crosscutting field or a jig for chopping tenons, dovetails or field joints, you’ll be able to simply retrofit clear blade guards that will let you see what’s occurring however maintain you from getting lower.
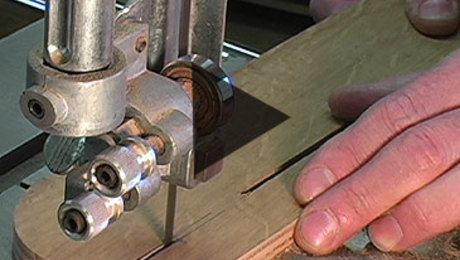
Field-joint-jig guard – I made the guard for my box-joint jig proven within the high picture in a few half-hour from a number of scraps of wooden and a Plexiglas cutoff bought from a neighborhood plastics retailer. (Glass retailers and {hardware} shops usually carry clear plastic sheet items.) The guard is a low field with wooden sides and a Plexiglas high that mounts immediately over the box-joint jig and gives safety forward of and after the lower. As an added bonus, I’ve observed that it deflects chips and makes dust-collection extra environment friendly. I made the guard’s body 21 in. extensive by 10 in. lengthy, which is extensive sufficient to deal with 10-in. drawer sides. I drilled holes within the in.-thick Plexiglas sheet in order that it could possibly be screwed to the highest of the body (depart the protecting paper on the Plexiglas throughout chopping and drilling to guard it from scratches). When attaching the plastic, I left it about an inch shy of the face of the jig, making a slot for the work piece. The two-in.-high sides present loads of clearance between the plastic and the blade. I chamfered and waxed the decrease edges of the edges to maintain them gliding easily. Then I connected the guard to the again facet of the box-joint jig with screws by means of the rear body member.
To supply blade safety behind the jig, I added a second guard constructed from a block of wooden and a 3-in. by 4-in. piece of Plexiglas, screwed to the underside of the rear body member (see the underside picture on the dealing with web page). Even should you don’t wish to make your complete guard body, including a rear guard is a wonderful concept. It protects you after the jig has been pushed by means of the lower if you’re reaching over the noticed desk and are most likely probably the most weak to blade contact. This sort of exit guard is an efficient addition to any sliding jig. And you can also make utilizing it even safer by clamping a cease block to the rip fence or proper to the desk that may restrict the ahead journey of the jig—permitting an entire lower by means of the work piece however stopping the blade wanting the exit guard’s rear block.
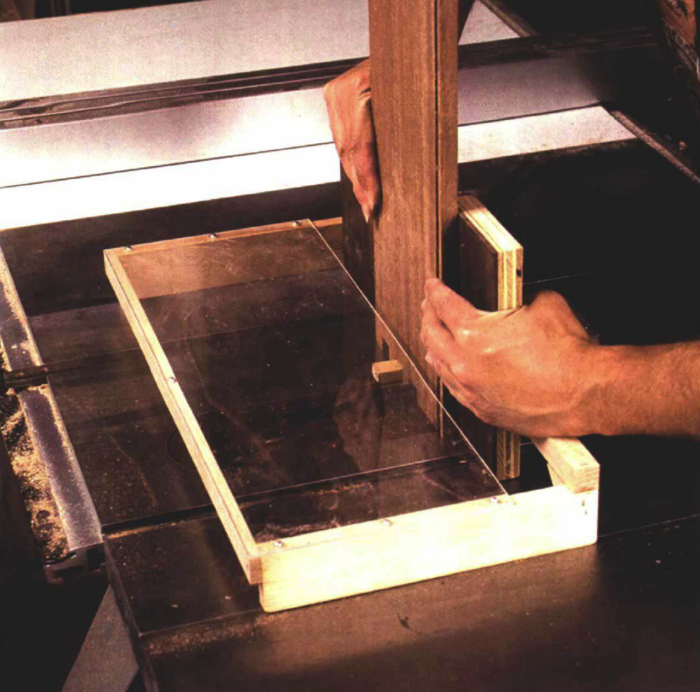
Tenoning jig guard – Defending my fingers from the blade concerned the addition of three parts to my sliding tenoning jig: a transparent plastic defend forward of the lower, an exit block to cowl the blade behind the lower and a hand relaxation to forestall my left hand, which holds the work piece towards the jig, from sliding down into hurt’s manner, as proven within the picture beneath.
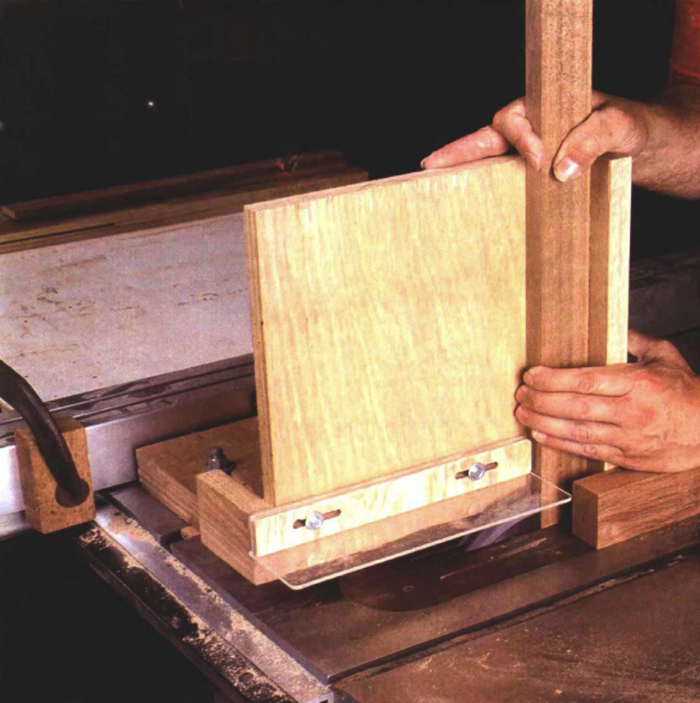
The clear defend is nothing greater than a l0-in.-long, 2 1/2-in.-wide piece of 1/8 in. thick Plexiglas screwed to the sting of a wooden strip. This strip mounts to the face of the tenoning jig by way of slotted holes I made utilizing a straight bit within the plunge router. The slotted holes enable me to shift the defend in or out relying on the width of the work piece. I glued and screwed a 2 1/2x2x1 1/2 wooden exit block to the again of the jig. I used a brass screw simply in case it’s unintentionally hit by one of many two saw-blades used throughout tenoning. A bigger block would offer extra safety, however so long as you employ the jig along with a cease block, this measurement is okay. The ultimate element, the hand relaxation, is a 4x2x1 block glued to the sting of the tenoning jig’s fence. You might place this block larger, should you discover it extra comfy.
Crosscut-box guard—A store made sliding crosscut field that rides within the desk noticed’s miter slots is nice for trimming and crosscutting lengthy boards or moldings. And including a guard is the proper strategy to make this sliding jig safer to make use of. The guard that I made for my crosscut field, as proven within the picture above is mainly an inverted U-shaped channel that rests on high of the inventory over the road of lower, stopping fingers from reaching into the blade.
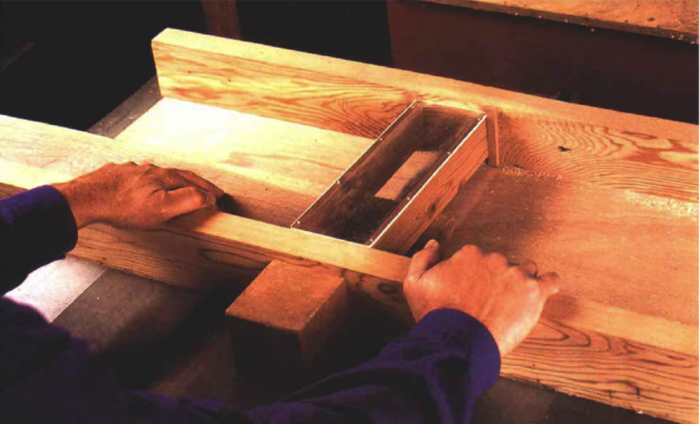
I began constructing the guard by chopping two 2 1/4 in.-wide, 3 in.-thick wooden sides and a 3 1/2 in.-wide, 1/8 in.-thick Plexiglas high, all barely shorter than the front-to-back dimension inside my crosscut field. I then nailed sides and high along with #16 brass escutcheon pins by means of holes drilled within the plastic. As a result of the guard was retrofitted to my crosscut field, I couldn’t lower grooves for the ends of the guard to slip in. However for a smaller (12-in. capability) field like mine, two slim information strips tacked on the within of the field’s entrance help are sufficient to maintain the guard in place and let it experience up and down.
Chamfering and rounding the ends and edges of the wooden sides makes the guard slide up and down simply. To defend the blade the place it exits the crosscut field, I added a rear guard that could be a variation on the one for the box-joint jig described beforehand. On this case, I merely glued and screwed on a wooden block to sheathe the blade.
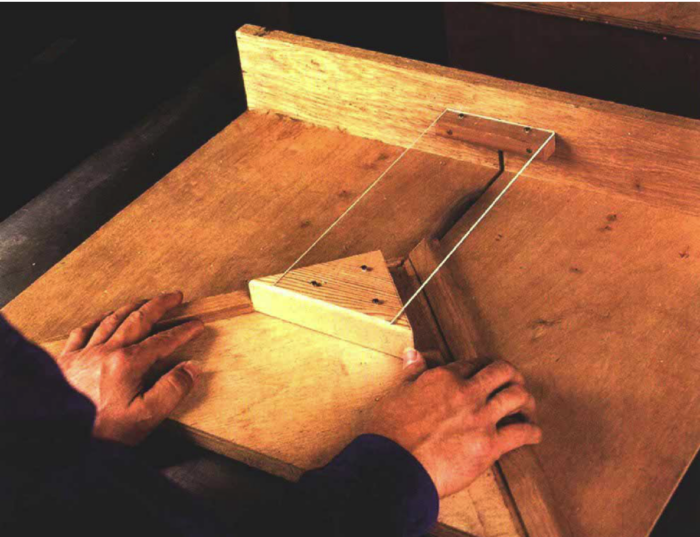
Sliding miter-carriage guard—Many woodworkers like to chop miters on the ends of moldings, image frames and different trim utilizing a carriage with twin 45° fences, which slides within the desk noticed’s miter-gauge slots. Once you use this kind of jig, you maintain the work piece towards the fence through the lower, and your fingers usually come near the blade. And as you end the lower, the blade exits between the fences, not removed from the place your thumbs are wrapped excessive of the fences. It’s an operation that begs for a guard. So as to add safety to my sliding miter jig proven within the picture beneath, I lower a triangular block from some scrap 2×4 I had across the store and glued and screwed it to the jig’s base plate simply behind the intersection of the fences. This block acts as an exit guard and a mounting floor for a transparent blade guard. The again finish of this blade guard, a 5-in. by 12-in. piece of in. Plexiglass is screwed to the highest of the block, and the entrance finish is screwed to a wooden strip nailed to the miter jig’s entrance cross help. To finish the protection therapy, I clamp a cease block to the noticed desk to forestall the blade from chopping by means of the exit block.

Shopmade Desk Noticed Throat Plate

Secure Procedures on the Desk Noticed
Important Push Sticks
Join eletters right now and get the most recent strategies and how-to from Positive Woodworking, plus particular affords.
Obtain FREE PDF
if you enter your e-mail deal with beneath.
View PDF